It’s craaaazy hot out there!
I realize that in February, I will be sooo sorry for complaining about this heat.
But the extremes are killing me. First, we had a late spring frost (I remember that because I lost my first tomatoes to it!),…then came all the rain…now the heat (+40 with the humidex)…then it will be -40 in February.
Oh the struggle to be Canadian.
Deal with the weather by indulging in these babies…I swear, you will forget our weather woes very, very quickly!!
Ingredients:
A 10 oz package (about 40 large marshmallows)
5-6 extra marshmallows (optional if you want an extra marshmallowy goodness)
1 1/2 c milk
1 1/2 c whipping cream
1 tbsp vanilla
pinch of salt
5 egg yolks
1/3 c brown sugar
1. Place your marshmallows on a foil lined baking sheet and either brown them using a kitchen torch or use the broiler on your oven to brown them (keep a close eye on them!); turn them over and brown again making sure they are browned on all sides.
If you are using the extra marshmallows, cut them into tinier pieces (cut each one into 4) and torch them too; set them aside.

2. Place the whole toasted marshmallows into a blender; set aside

3. In a medium sized saucepan, heat the cream, milk and vanilla together on low heat; bring to a simmer or until you can see tiny bubbles start to form around the edges of the pan (make sure you don’t boil it).

4. In a mixing bowl, beat the egg yolks. Add brown sugar and salt and mix again.

3. To this egg mixture, very slowly add the warm milk in a stream; mix again until combined well.

4. Pour the custard mixture back into the saucepan (pouring it through a sieve here helps…but, if you don’t do it now, we will do it again later so don’t worry) and heat on medium/low until it is thick and coats the back of a spoon.
5. When you think it is the consistency of a thin custard, take the wooden spoon out and run your finger down the back of the spoon; if the mixture makes a line, then you are good to go (if you want to see a visual of what this looks like, check out the step-by-step instruction in this brown butter ice cream post).
6. Put the mixture through a strainer to ensure a smooth mixture (the sieve will catch any bits – like any pieces of egg that may have curdled while you were cooking the custard or the icky white “slime” that connects the yolk to the white). Pour this mixture on top of the marshmallows that are in the blender; blend at high speed until incorporated and then pour into a bowl.

7. The best way to make sure the ice cream processes properly in the machine is to cool the custard mixture in the fridge overnight and put it into an ice cream maker the next day (if you need it that same day, wrap the outside of the bottom of the bowl with a wet, cold dish towel and place it in the freezer to cool it off; stir it every 20 minutes or so until it is completely cool).

8. When it’s cool, pour it into your ice cream maker and process it for about 20 minutes.

If you are adding the extra marshmallow pieces, add them after it has been mixing for about 10 minutes.

9. After the mixing is complete, it should look like soft serve ice cream (see picture below); now you can scrape it into a rectangular container and keep it in the freezer for scooping later.

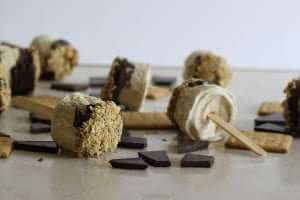
10. You can also make ice cream sandwiches and wrap for individual treats (like the first picture in this post where I used graham crackers and dipped them in chocolate for a s’more treat!!).
11. Another option is to make ice cream pops where you spoon the mixture from the ice cream maker into Dixie cups (or smaller cups…plastic espresso cups would be great!!) and insert a popsicle stick in the middle; freeze until solid.
12. Once they are frozen (I like to keep them in the freezer overnight), run a knife around the edge and pull out (if you use plastic cups, you can just warm the outside by dipping them in hot water…if you use Dixie cups, you can just tear the paper off…if you’re dumb like me and use Styrofoam, be prepared for a mess!!)
13. If you want extra goodness, melt some chocolate (use this trick and the microwave for a quick melt!!) and quickly dip the pops in.
…you might need to use a butter knife to help with the spreading!
Crush some graham crackers in a baggie and dip the chocolate end into the crumbs.
Beauty!!
Place these pops on a cookie sheet lined in plastic wrap or parchment. Once they are frozen, you can individually wrap them in plastic wrap (but I guarantee you they won’t last long enough!
And, with this heat, you can probably eat like 7 of these!


