
Ah, turkey. The bird that strikes equal parts joy and fear into home cooks everywhere. One minute, you’re daydreaming about that golden, glistening masterpiece coming out of the oven to applause and camera flashes. The next minute, you’re panic-Googling “how to save a dry turkey” while your in-laws are eyeing the gravy boat like it’s a life raft. You NEED to know how to cook a turkey…it will change your life!!
But don’t worry — we’re not going to stress out this year. Nope. This is your year to conquer the turkey. I’ve got you covered with a foolproof, flavorful, juicy method that makes your oven smell like a dream and your guests think you’ve secretly gone to culinary school (which, if you have — hey, welcome to the club!).
Jump to RecipeWhy You’ll Love This Recipe
- It’s stress-free: This method uses simple steps you can do ahead of time, meaning less chaos on the big day.
- It’s juicy and flavorful: No more dry turkey! A little brining (if it’s a wild bird), a little butter, lots of exciting flavours and some patience go a long way.
- It’s flexible: Whether you want classic, herby, citrusy, or smoky — I’ve got options for you.
- It’s impressive, even if you’ve never cooked a turkey before. This recipe is beginner-friendly but tastes chef-level.
And bonus: your house is going to smell like the holidays themselves moved in and started roasting dinner.
Ingredients (and Why They Matter)
Here’s the thing — turkey isn’t complicated, but every ingredient has a role. Think of this list as your culinary team. Each player has a purpose!
- 1 whole turkey: The star of the show. I like to go for a fresh turkey when possible (frozen works too, just plan thawing time — about 24 hours per 4 lbs in the fridge); and if it’s a wild bird, a little brine goes a long way.
- Kosher salt: For dry brining — If you buy a high-quality turkey from the store (like Butterball), then you won’t need to brine the turkey. However, if the turkey is wild, you should brine it the night before to make sure it will be moist and flavorful.
- Butter (softened): Because butter = flavor. It also helps the skin crisp beautifully. You can use olive oil if you want a lighter version.
- Garlic: Adds depth and that cozy, savory aroma that screams “home-cooked.”
- Fresh herbs (rosemary, thyme, sage): The classic trio that makes your kitchen smell like a Norman Rockwell painting.
- Onion, carrot, celery: These go in the roasting pan under the turkey to flavor the drippings for gravy. Think of them as your aromatic bed.
- Lemon or orange (optional): A little citrus brightens up the richness.
- Chicken broth or stock: Keeps things steamy in the oven and gives you a head start on delicious pan gravy.
A Note About Stuffing:
I never put the stuffing in the bird – I always cook it in a baking dish on the side (which is actually called dressing and not stuffing!!). If you put it in the cavity of the turkey, the turkey meat will be dry by the time the temp of the stuffing reaches the proper temperature!! That’s why I fill the bird with herbs and citrus to make sure there is lots of flavour in there!! Try this traditional recipe for stuffing!!

Hints About How to Cook a Turkey:
- What is the Most Important Thing to Know About Turkeys: Turkeys have hardly any fat which means it’s your job to keep it moist.
- Foolproof (but difficult) Way to Lock in Moisture: One way (although I’ve never done it) is to start the turkey upside-down (breast side down) so the juices get trapped in the driest part, and then flip it over to finish cooking it breast side up! It can be a bit messy/tricky…if this is your first time roasting a turkey, I wouldn’t suggest you try this now!
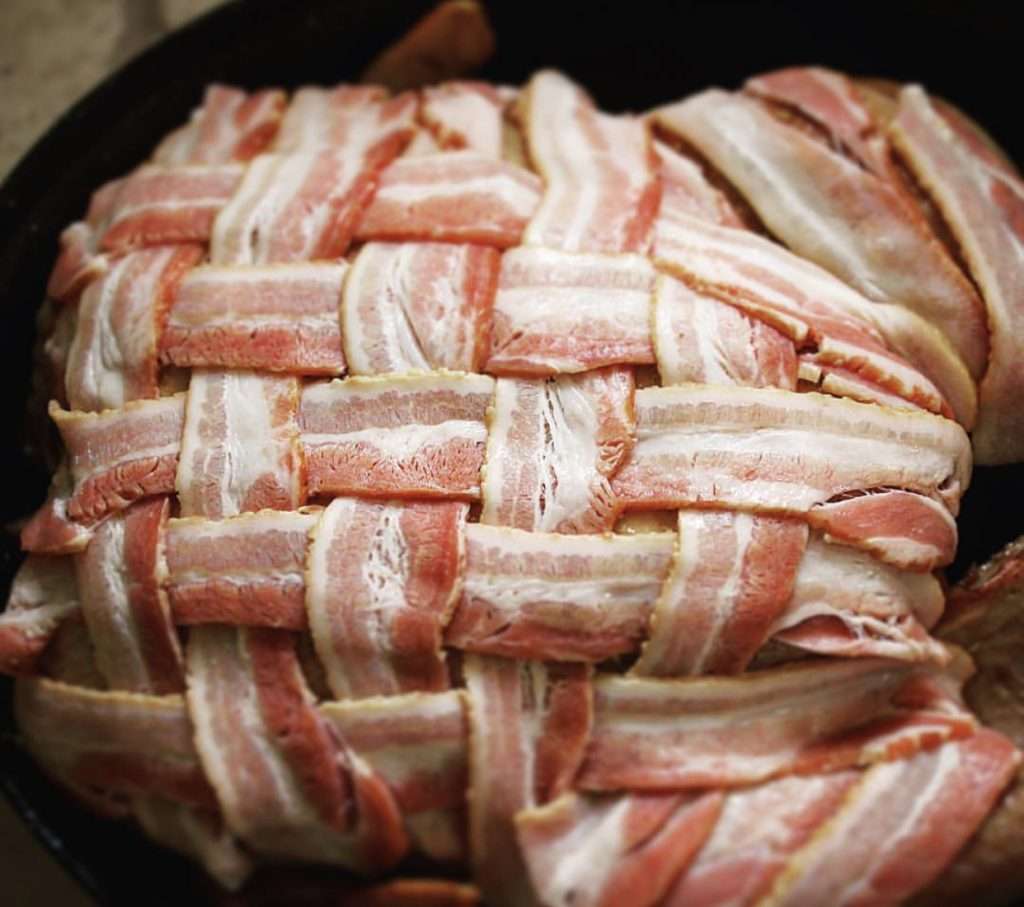
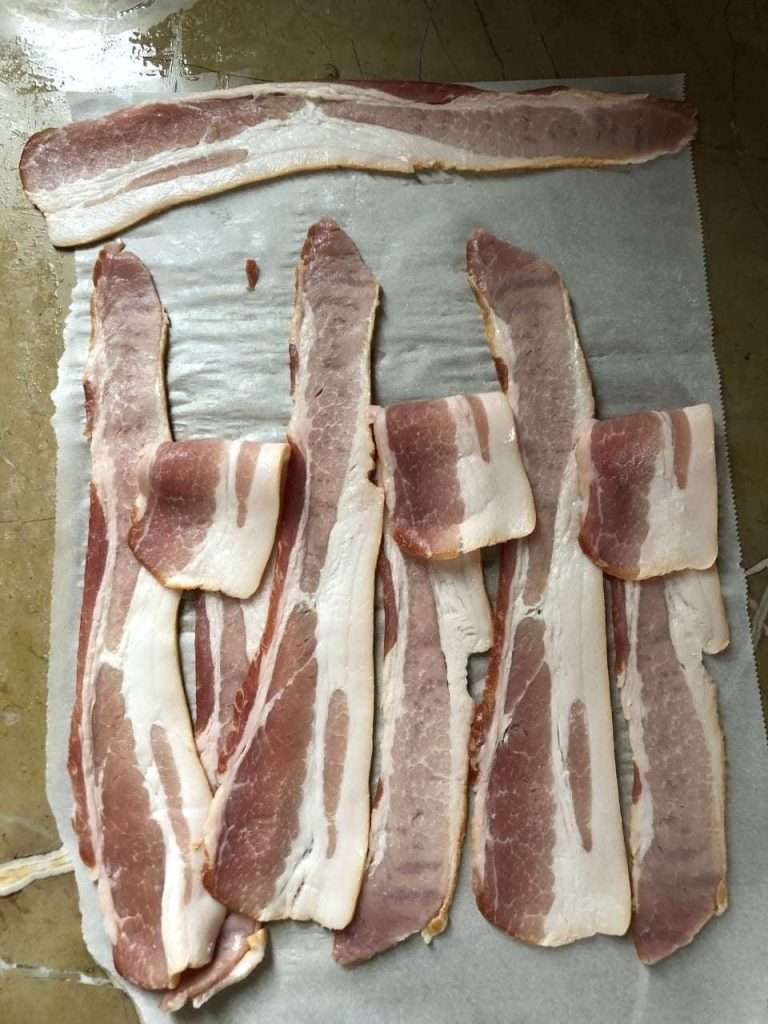
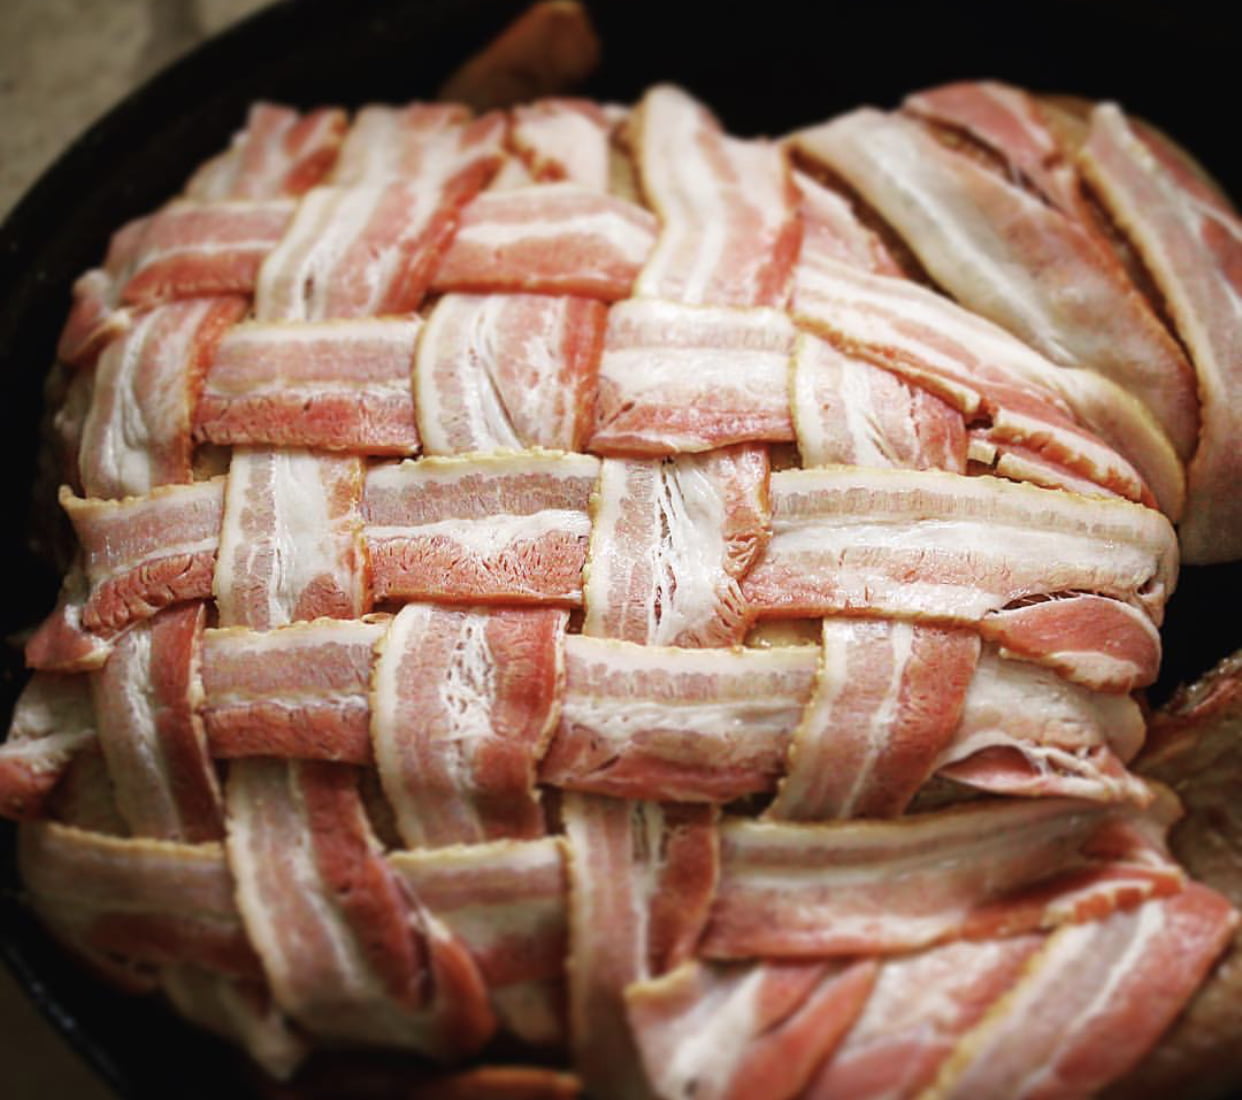
- Do a Bacon Weave: One of the ways to ensure a moist breast is to do a bacon weave on top of the breast (check out the photos below)…Once the weave is done, carefully invert the parchment onto the turkey and adjust the slices if needed, tucking in any unruly pieces. if you don’t like a wee bit of smokiness, pick another method!
- How Long? Plan on 13-15 minutes of cooking time for every pound of turkey if you are roasting empty (which I recommend…I always cook my stuffing on the side!) and around 15 minute per pound if stuffed.
- Sneaky Flavour Tricks: Get more flavour into your bird by throwing some citrus into the cavity (take a look at this post to find out about keeping your lemons for this reason!!)
- A Trick with the Temp: Heat the oven to 450°F to preheat and then drop the temperature to 350°F when putting the turkey into the oven….the higher temperature at the beginning ensures a crispy skin and moist centre (you can even cook the turkey for about 20 minutes at the higher temp and then lower it). The bird will brown evenly all around at a lower temperature. If the breast is getting too brown, tent with foil for the last 30 to 45 minutes of roasting.
- Don’t Baste the Turkey: Basting is really unnecessary to produce a beautiful golden brown turkey. It also requires you to constantly open the oven, which causes the oven to loose heat and the turkey to take longer to cook–which could lead to a dry turkey. By smearing an herb butter mixture over the outer and inner skin of the turkey you will ensure the skin will brown beautifully, and taste amazing.
- How Do You Know it’s Done? The turkey is done when it registers a minimum of 165° in the thickest part of the thigh…the juices should run clear when you pull the leg away a bit!
- Resting: Make sure you rest the turkey for at least 15-30 minutes before carving….if you don’t, all the essential juices the keep the bird moist will come out (resting gives the liquid a chance to re-absorb into the turkey!). This is one of the most important steps when roasting a turkey. When it’s whole, your turkey will stay hot for a few hours after cooking, so don’t freak out – it won’t be cold at the table!
- Gravy: While the turkey “rests” is the perfect time to make gravy for serving along side your beautiful bird…simply move the turkey to a cutting board and cover loosely with foil to keep warm. Now you can use all those tasty pan drippings for gravy making (I don’t really use a recipe for this…just put the roasting pan right on the stove top, scoop away some of the fat on top, make a slurry [which is some chicken stock and flour mixed together] and then pour it into the pan; stir it well and, over medium heat add chicken stock until it is the thickness you like – and remember to season it with salt and pepper to your taste!).
- Make-Ahead Gravy: If you would rather not make the gravy the same day and would prefer to make it ahead, that’s totally doable too. I love using Jamie Oliver’s make-ahead gravy…so smart!!


What if you have a Frozen Turkey?
How to Safely Thaw the Turkey:
For the best roast turkey, let your turkey completely thaw before cooking. If it was completely frozen when you bought it, the turkey will thaw within a few days in the fridge, (about 24 hours for every five pounds of turkey). For quicker thawing, place the turkey in a cold water bath and change the water every 30 minutes until it’s thawed.
But if you totally forgot to thaw it (don’t worry)…I got your back:
How to Cook a Turkey from Frozen:
If your turkey isn’t completely thawed yet, don’t worry! You can roast a completely turkey and it will turn out fine! If your turkey is still frozen — fully or partially — just hop on over to this frozen turkey tutorial and follow the instructions. You’ll be fine…all is not lost!! So if one of the things you need to cross of your list is how to cook a turkey that is still frozen, you are good!!
Flavor Changes & Substitutions
This turkey recipe is a blank canvas — once you get the basics right, you can customize it to your heart’s (or stomach’s) content.
- Herb and garlic butter turkey: Stick to the classic herbs for that traditional, cozy flavor.
- Citrus & herb turkey: Add orange and lemon zest to your butter mix and tuck a few citrus slices inside the cavity. It gives a fresh, bright lift.
- Smoky maple turkey: Mix butter with smoked paprika, a drizzle of maple syrup, and a pinch of cayenne for sweet heat.
- Spice it up: Try a Moroccan twist with cumin, coriander, cinnamon, and a touch of honey.
- Dairy-free: Use olive oil instead of butter — it still crisps the skin beautifully!
The idea is to make this bird yours.
How to Cook a Turkey (Short & Simple)
- Brine it if It’s Wild
- Butter it up with a paste of butter, garlic and herbs
- Prep the pan with veg
- Roast for the proper time according to the size of the bird
- Check doneness (use an oven thermometer)
- Rest before cutting
- Make gravy (optional but highly encouraged)
Equipment You’ll Need
- Large roasting pan
- Roasting rack (help air to circulate around the bird in the oven, which makes for more even cooking and crispier skin. Place aromatic vegetable like onions, carrots and celery in the bottom of the roasting pan to help enhance the flavour of the turkey)
- Meat thermometer (non-negotiable!) – try this wireless one!!
- Basting brush or spoon
- Aluminum foil
- Carving knife and cutting board
- Paper towels (for drying the bird before brining)
Carve Ahead to Reduce Carving Table Stress:
Carving a turkey is just like carving a roast chicken – it’s just much bigger. It’s really not that hard…you just have to deconstruct the turkey first. Cut off the large pieces (breasts, thighs, drumsticks, etc.) and slice the meat portion of the larger pieces on a cutting board, and then arrange it nicely on a platter. Pre-slicing makes it easy for guests to help themselves and avoids mess at the table. You can put the whole bird on a platter, present it to your guests and then bring it back in the kitchen to begin the dismantling process!
Make-Ahead, Storing & Freezing
Make-ahead:
You can dry brine your turkey up to 48 hours in advance — it actually gets even better! You can also prep the butter mixture and chop your aromatics a day ahead.
Storing leftovers:
Cool completely before refrigerating. Store sliced turkey in airtight containers for up to 4 days.
Freezing:
Turkey freezes beautifully! Store portions in freezer bags for up to 3 months. To reheat, thaw in the fridge overnight and warm gently with a splash of broth to keep it moist.
Pro tip:
If you’re planning to make stock or soup, save those bones! Toss them in a freezer bag — future you will thank you.
Nutritional Information (Per Serving, about 6 oz of turkey meat)
- Calories: ~280
- Protein: 38g
- Fat: 12g
- Carbohydrates: 0g
- Sodium: depends on salt level in brine
(And yes, turkey is a fantastic lean protein — perfect for adding to high-protein meals all week long.)
Similar Recipes on the Blog You’ll Love
If you loved this turkey recipe, you might want to check out:
- 3 Ways to Cook a Perfect Roast Chicken — same technique, smaller bird, weeknight-friendly.
- Bacon Wrapped Chicken: A One-Pan Weeknight Meal — for when you’re craving turkey with the bacon weave but don’t have time to do a whole turkey.
- Prosciutto Wrapped Stuffed Chicken Thighs— always moist because we’re using thighs and wrapped in Italian goodness (aka prosciutto), this tastes like comfort in a dish.
- Delicious Roasted Chicken and Brie Quesadillas with Fresh Mango Salsa — a cozy, fresh way to use every last bit of your bird.
Final Thoughts
Cooking a turkey doesn’t have to be intimidating. It’s really just a big, delicious roast chicken with fancier clothes. Once you understand the basics of how to cook a turkey— seasoning, temperature, and rest time — you can put your spin on it and make it shine.
So this year, take a deep breath, tie on your apron, and channel your inner kitchen boss. The bird’s got nothing on you.
And when that golden, juicy turkey comes out of your oven and everyone at the table lets out an “oooh,” just smile and say, “Oh, it was nothing.”
(But we’ll both know it was everything.)
How to Cook a Turkey
Ingredients
- 1 whole turkey 10–14 lbs for 6 ppl
- 3-4 tbsp Kosher salt if you are dry brining
- 4 tbsp Butter softened
- 6 cloves garlic minced
- 1/3 cup fresh herbs chopped (rosemary, thyme, sage
- 1 large onion quartered
- 4 carrots peeled and cut into 2″ pieces
- 2 stalks celery cut into 2″ pieces
- Lemon or orange optional:
- 2 cups chicken broth or stock plus more if you’re making gravy
Instructions
- If your turkey is frozen, defrost it in the fridge but give yourself time (about 24 hours for every 4-5 lbs).
- If you are cooking a wild turkey, the night before, pat your turkey dry and rub it generously with kosher salt (inside and out). Let it rest uncovered in the fridge overnight. This dry brine makes the meat juicy and flavorful (if it’s a store bought bird, you can skip this step)
- Giving yourself enough time to cook your bird (about 13 minutes per pound), preheat your oven to 425°F.
- Mix softened butter with chopped herbs and minced garlic. Gently loosen the skin of the turkey breast and rub half the butter mixture underneath, and the rest all over the outside.
- Place onion, carrot, and celery in the bottom of a roasting pan. Add a cup or two of broth. Set the turkey on a rack over the veggies, breast-side up.
- Lower the temperature and roast uncovered at 325°F. General rule: about 13–15 minutes per pound. (So a 12-pound turkey takes around 3 hours.)
- Check halfway through — if the skin is browning too fast, tent it loosely with foil
- Use a thermometer! Turkey is done when the thickest part of the breast reads 165°F (74°C) and the thigh hits 175°F (80°C)
- This is the step that separates dry turkey from juicy turkey. Let it rest at least 30 minutes before carving. This allows all the juices to settle back into the meat.
- Use the pan drippings and veggies for a quick gravy. Strain, simmer, thicken with a little flour or cornstarch slurry, and pat yourself on the back.



0 Comments
Trackbacks/Pingbacks